Introduction
This create this effect is one of the fun techniques to combine when doing long exposure (night)shots. There are a lot of tutorials out there explaining this technique. In this tutorial I will try to give you some practical tips how to execute this technique. The written advice is what works for my. If you have any thoughts or suggestions feel free to comment.
This create this effect is one of the fun techniques to combine when doing long exposure (night)shots. There are a lot of tutorials out there explaining this technique. In this tutorial I will try to give you some practical tips how to execute this technique. The written advice is what works for my. If you have any thoughts or suggestions feel free to comment.
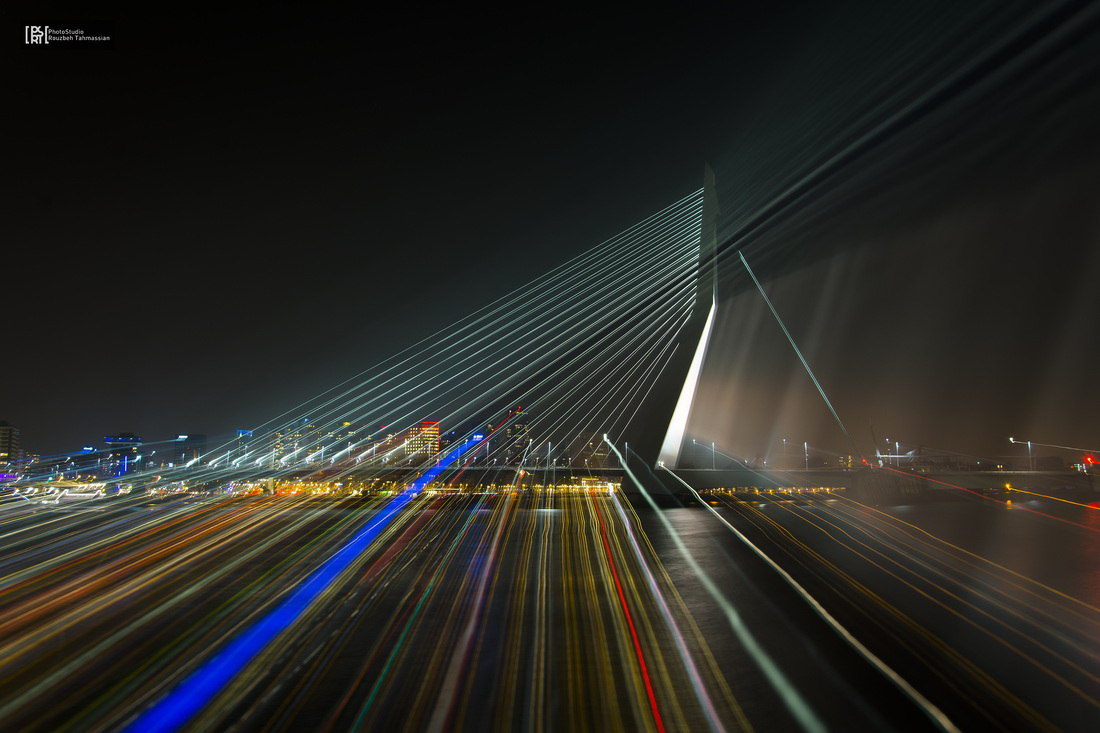
EXIF data: Nikon D7100, Nikon AF-S DX 18-105mm f/3.5-5.6G ED VR, f/7.1, ISO 100. Total exposure: 15 sec
Equipment
- Sturdy tripod: this technique is hard to execute without a good and strurdy tripod. I've tried it earlier shooting without a tripod, but this is only possible with relatively faster shutterspeeds and by moving the camera rather to zoom in/out. See my example here: http://www.photostudiort.com/1/post/2014/01/the-zoom-effect.html
- Remote shutter: use a wired of wireless remote shutter to minimize camera movement.
- Battery life: speaks for itself, especially when doing long exposure nightshots. If you use an extra battery grip use this. This is my own experience. This technique is so addictive and fun that you forget all about battery life. You just go on and on to get the picture right.
Settings
- Manual mode: make sure you have full control of the situation.
- ISO: as low as possible. Most cameras have ISO 100 as lowest level. Make sure AUTO-ISO is turned off. Using lower ISO reduces noise levels, especially with long exposures.
- Lens: obviously you need a zoom lens to do a zoom effect! Try to use the widest lens you have with the largest range. This will give the maximal effect to the zoom.
- Turn of any VR (Vibration Reduction) on your lens.
Execution
- Shoot in a clear night situation.
- Isolate and center a subject with a lot of light in it or around it: think of buildings, bridges, etc.
- Leave at least 50% empty space (darkness of the air, water, etc.) around the subject.
- Find the optimal exposure time and Aperture. I prefer Apertures between F/8 and F/16. Lower could give less sharpness, higher causes diffraction.
- Focus on the subject automatically, then turn the switch to Manual Focus.
- Once released the shutter, zoom in after reached 2/3 of the exposure time as even as possible. Try to do this with minimal camera movement to get straight lines.
Example: assume F/8, 15 sec, ISO 100 will give the optimal light. After released the shutter, you wait 10 sec. After 10 sec., you start to zoom in from lets say 18mm to 55mm in the remaining 5 sec. Try to execute the zoom in even movement all the way.
Post-processing
This is nothing special. Just use your usual long exposure presets. I like to use higher contrast and saturation levels to emphasize the light beams.
I hope you have fun trying this technique. If you have any questions or want to add something please feel free to comment.
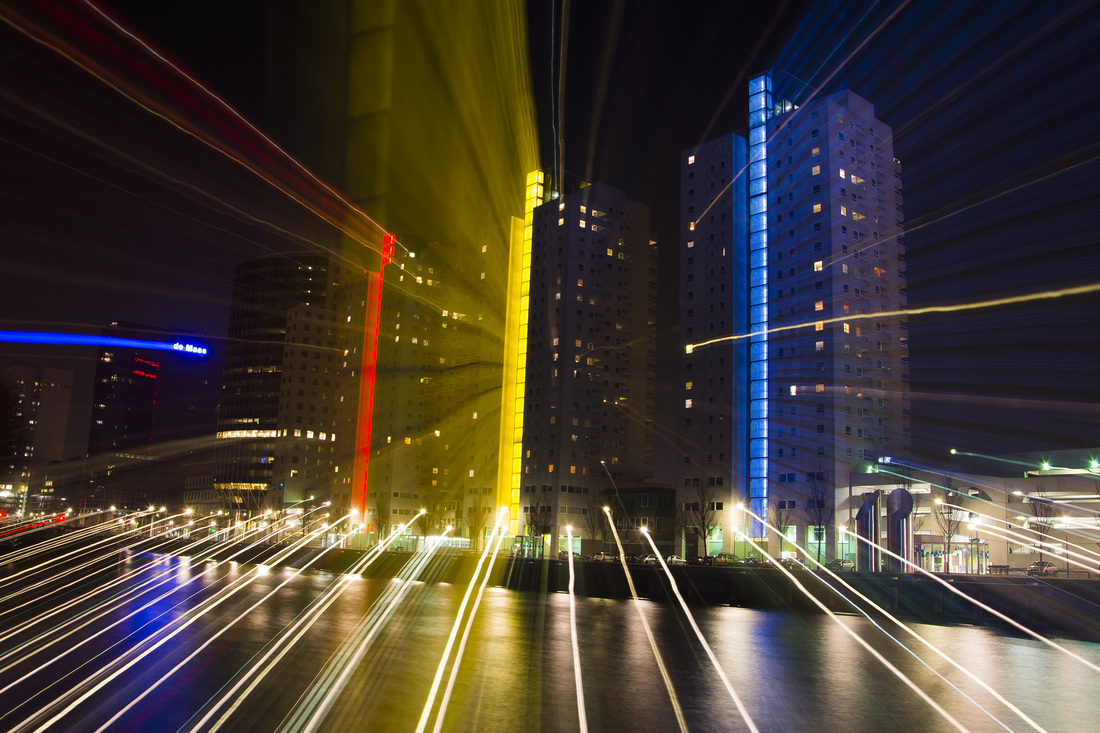
EXIF data: Nikon D7100, Nikon AF-S DX 18-105mm f/3.5-5.6G ED VR, f/7.1, ISO 100. Total exposure: 20 sec. Last 7 sec zoomed from 18 mm till approx. 90 mm.
 RSS Feed